CoreDrive
Waveshare 10.5inch Capacitive Touch AMOLED Compatible with Raspberry Pi 4B/3B+/3A+/2B/B+/A+/Zero/Zero W/WH/Zero 2W CM3+/4 HDMI Port 2560×1600 2K Resolution Supports Jetson Nano/Windows
Waveshare 10.5inch Capacitive Touch AMOLED Compatible with Raspberry Pi 4B/3B+/3A+/2B/B+/A+/Zero/Zero W/WH/Zero 2W CM3+/4 HDMI Port 2560×1600 2K Resolution Supports Jetson Nano/Windows
Couldn't load pickup availability
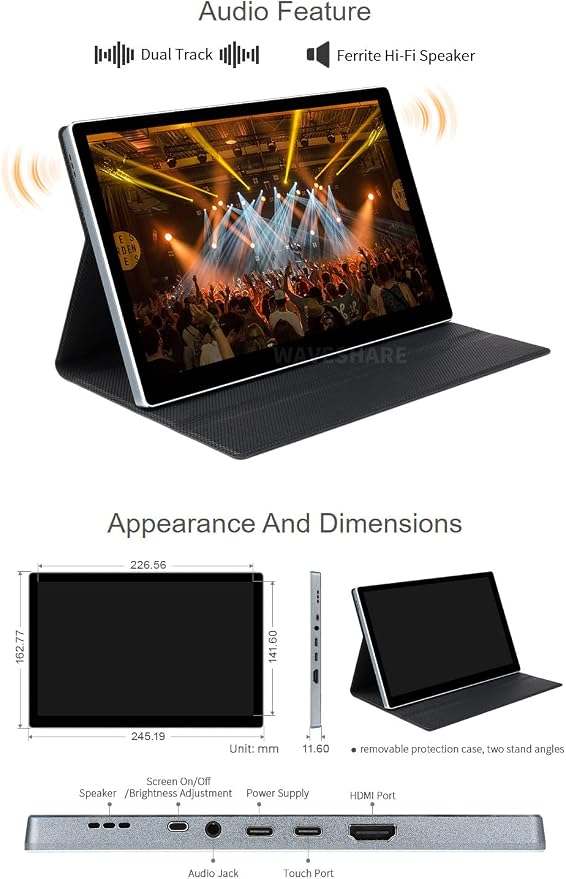
- Provide online user manual, please check the manual carefully before using! - Supports Raspberry Pi 4B / CM4, or more powerful future versions* (enough GPU performance is required to drive this 2K display) - 10.5inch AMOLED, 2560 x 1600 resolution. Up to 10-points touch, depending on the operating system. Up to 6H hardness toughened glass panel. - Optical Bonding screen, better display experience, dust-proof. When working with Raspberry Pi 4B, it supports Raspberry Pi OS / Ubuntu/Kali, driver free. - When working as a computer monitor, it supports Windows 11/10/8.1/8/7, ten-points touch, and driver free. Embedded Hi-Fi Speaker, 3.5mm audio jack, supports HDMI audio output. CNC alloy enclosure.
Product description
Introduction
Features
Working with Windows PC
Connection Examples
Audio Feature
Working with Raspberry Pi
Appearance And Dimensions
Screen Saver
10.5inch Capacitive Touch AMOLED, HDMI Port, 2560×1600 2K Resolution, Fully Laminated Toughened Glass Panel. Supports Raspberry Pi 4B and Jetson Nano and can also be used as a computer monitor.
When working with a PC, 10.5inch HDMI AMOLED can support Windows 7/ 8/ 8.1 /10/11 OS
1. Connect the TOUCH interface of the display to the USB interface of the PC. Wait for a while, the windows will automatically recognize the touch function.
2. If you use HDMI, you need to connect the HDMI interface of the display to the HDMI port of the PC. About 10s later, you can see the display properly. If you need to output sound, you can insert 3.5mm earphones into HP ports or use the internal speaker directly.
Note: The USB interface of some PCs may cause insufficient power supply due to aging. At this time, you can use the matching 5V 3A Type-C power adapter to supply power to the screen power port to achieve the best display effect.
100% Adobe RGB, 100% DCI-P3 Color Gamut, Rendering More Colors, Bringing More Immersive Movie Experience
The Next-Generation Display Technology, 4.09M Active Light-Emitting Pixels
Compared to those traditional LCD displays, the AMOLED screen features precise light-control capability, representing more delicate colors, more picture details, and more vivid video image
Striking One-Hundred-Thousand Grade Contrast Radio
Compared to normal LCD displays, the AMOLED screen features ultra high contrast radio, which means hundredfold light/dark performance. Even when representing gradations and details like the deep starry sky, it is able to bring you immersive experience easily.
Brighter Highlight, Darker Shadow
The regular LCD requires backlight and color film to work, i.e. it represents colors by controlling the white light from backlight layer to pass through the color film, and generally there's so called light-leak issue.
Unlike LCD, the AMOLED features active emissive technology, each pixel on the AMOLED will light up by itself like a firefly, or turn off completely, to create brighter highlight or true black shadow, while retaining rich details.
When working with Raspberry Pi, 10.5inch HDMI AMOLED can support various systems like Raspberry Pi OS/Ubuntu /Kail. Herein we take Raspberry Pi OS as an example.
Raspberry Pi cannot recognize and adapt to the resolution of display plugged, therefore, we need to set the resolution of Raspbian manually.
Please download the latest version of the image on the Raspberry Pi official website.
1) Download the compressed file to the PC, and unzip it to get the .img file.
2) Connect the TF card to the PC, use SDFormatter software to format the TF card.
3) Open the Win32DiskImager software, select the system image downloaded in step 1, and click ‘Write’ to write the system image.
4) After the image has finished writing, open the config.txt file in the root directory of the TF card. Add the following code at the end of config.txt, then save and quit the TF card safely.
If you are using Kali system,please also add the line dtoverlay=vc4-fkms-V3D to your config.txt file to make the AMOLED displays full screen.
5) Save and eject the SD card. Plug the card to your Raspberry Pi
6) Connect the Touch interface of the display to one USB port of Raspberry Pi
7) Connect HDMI interface of the display to HDMI interface of Raspberry Pi
8) Power on Raspberry Pi, and wait for a few seconds until the displays normally. Note: Some Raspberry Pi's USB ports may cause insufficient power supply due to aging. At this time, you can use the matching 5V 3A Type-C power adapter to supply power to the screen power port to achieve the best display effect.
AMOLED screen has many advantages like high contrast, wide color range, wide view angle, and so on. However, it is easy to face a burn-in problem if displaying the same content for a long time. In this case, we recommend you set a screen saver and do not let the AMOLED display the same static image for a long time (cannot longer than 1h).
Share